![](https://substackcdn.com/image/fetch/w_720,c_limit,f_auto,q_auto:good,fl_progressive:steep/https%3A%2F%2Fbucketeer-e05bbc84-baa3-437e-9518-adb32be77984.s3.amazonaws.com%2Fpublic%2Fimages%2Fcafcf48e-e94a-40e1-9dcb-bfad91162fca_1440x1440.jpeg)
![](https://substackcdn.com/image/fetch/w_720,c_limit,f_auto,q_auto:good,fl_progressive:steep/https%3A%2F%2Fbucketeer-e05bbc84-baa3-437e-9518-adb32be77984.s3.amazonaws.com%2Fpublic%2Fimages%2F61ef6c89-5e4a-4e42-a904-8253277f9758_1440x1440.jpeg)
My dad wondered if I could make a quilt for him that was super cozy - especially because he loves throwing open the bedroom windows during chilly Wisconsin winter nights. This was a fun project to do from beginning to end. And now that it’s done and delivered, I understand it’s just what Dad had hoped! So pleased!!!
Here is how this quilt came together. The project started by doing some research on available fabrics. I’d never sewn a quilt with anything but quilting cotton, so I was happy to find Woolies - a cotton flannel fabric (this by Bonnie Sullivan for Maywood Studios). It is a soft, sturdy fabric that’s quite easy to sew and quilt. It was perfect for this quilt!
![](https://substackcdn.com/image/fetch/w_474,c_limit,f_auto,q_auto:good,fl_progressive:steep/https%3A%2F%2Fbucketeer-e05bbc84-baa3-437e-9518-adb32be77984.s3.amazonaws.com%2Fpublic%2Fimages%2Fd5af8654-832b-4bc2-ae0b-dd1d516f38a4_4032x3024.jpeg)
![](https://substackcdn.com/image/fetch/w_474,c_limit,f_auto,q_auto:good,fl_progressive:steep/https%3A%2F%2Fbucketeer-e05bbc84-baa3-437e-9518-adb32be77984.s3.amazonaws.com%2Fpublic%2Fimages%2F67facd8d-b7c4-45a9-8338-41580b24f024_4032x3024.jpeg)
![](https://substackcdn.com/image/fetch/w_474,c_limit,f_auto,q_auto:good,fl_progressive:steep/https%3A%2F%2Fbucketeer-e05bbc84-baa3-437e-9518-adb32be77984.s3.amazonaws.com%2Fpublic%2Fimages%2F29113da8-1f62-4b3d-9646-59d9c1c99c06_926x1376.png)
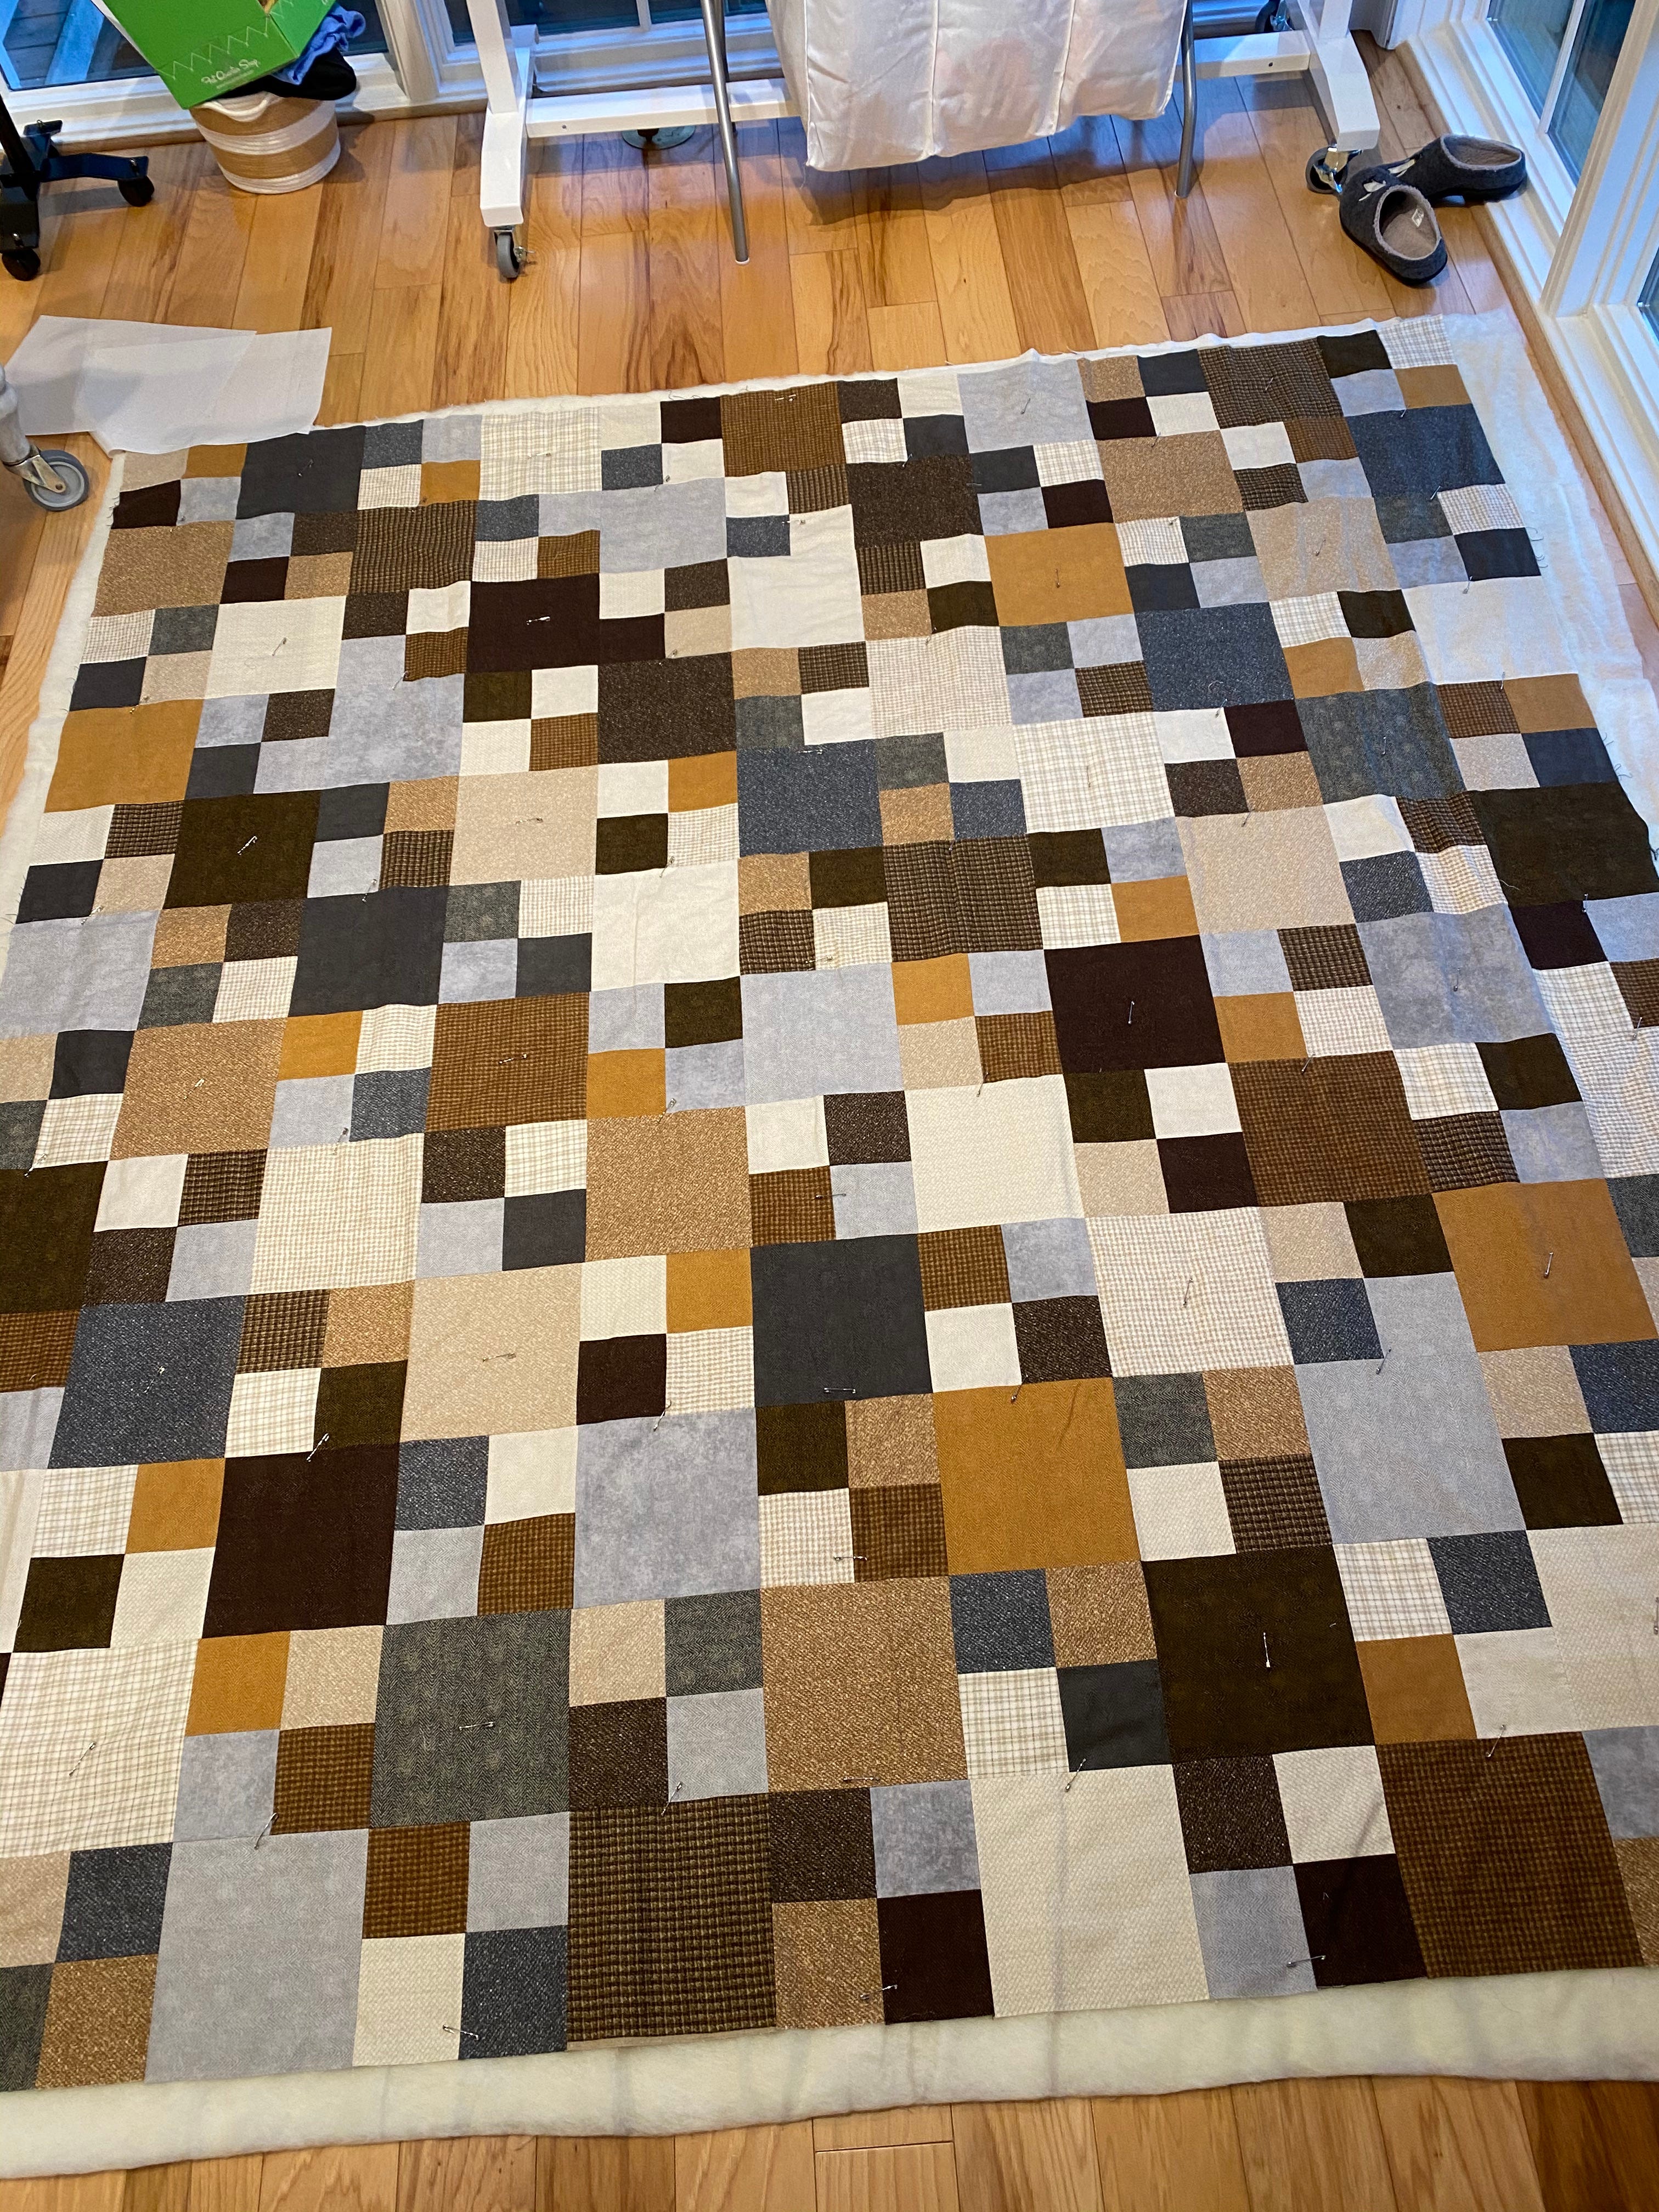
Instead of cutting LOTS of 4” squares by hand, I decided to pull out my Sizzix - a die-cutting machine. Using this machine to cut fabric assured that all of the oodles of 4” squares that were incorporated into this quilt were perfectly square - making all the difference when joining pieces - straight lines and exact measurements make all the difference in the success of how the quilt comes together. For the larger squares used in the quilt, I cut those using my rotary cutter.
I don’t have any pictures of the process of laying out the colors, but I moved around the 4” and 8” squares (usually on my sewing room floor) until I was satisfied with the layout. The only rule I had for the design was to alternate an 8” square with a 4-4” square block. Once I had the blocks in the spots where I liked them best, I simply sewed the blocks into rows, and then sewed rows to each other to complete the quilt top.
![](https://substackcdn.com/image/fetch/w_474,c_limit,f_auto,q_auto:good,fl_progressive:steep/https%3A%2F%2Fbucketeer-e05bbc84-baa3-437e-9518-adb32be77984.s3.amazonaws.com%2Fpublic%2Fimages%2Fb6c8260c-0e7b-40cb-9734-4d47f4a168da_4032x3024.jpeg)
![](https://substackcdn.com/image/fetch/w_474,c_limit,f_auto,q_auto:good,fl_progressive:steep/https%3A%2F%2Fbucketeer-e05bbc84-baa3-437e-9518-adb32be77984.s3.amazonaws.com%2Fpublic%2Fimages%2F6571c4b3-1b8d-4cfb-b906-299d025b49fe_4032x3024.jpeg)
![](https://substackcdn.com/image/fetch/w_474,c_limit,f_auto,q_auto:good,fl_progressive:steep/https%3A%2F%2Fbucketeer-e05bbc84-baa3-437e-9518-adb32be77984.s3.amazonaws.com%2Fpublic%2Fimages%2Fd0097b39-9858-4c18-8d44-dc9bfd728519_4032x3024.jpeg)
For the back of the quilt, I used two larger pieces of one of the fabrics I had used in the blocks on the front and then stitched a strip of scraps to place between those to larger pieces.
![](https://substackcdn.com/image/fetch/w_720,c_limit,f_auto,q_auto:good,fl_progressive:steep/https%3A%2F%2Fbucketeer-e05bbc84-baa3-437e-9518-adb32be77984.s3.amazonaws.com%2Fpublic%2Fimages%2F4e469a66-e16e-4786-bfe3-e38d3af4c54c_4032x3024.jpeg)
![](https://substackcdn.com/image/fetch/w_720,c_limit,f_auto,q_auto:good,fl_progressive:steep/https%3A%2F%2Fbucketeer-e05bbc84-baa3-437e-9518-adb32be77984.s3.amazonaws.com%2Fpublic%2Fimages%2F903d4810-f2dd-4e1f-a3e3-e4ef4fc94dbb_1440x1440.jpeg)
I used a wool batting between the quilt top and back. I decided to simply quilt the quilt using a diagonal straight stitch (corner to corner) through the blocks.
![](https://substackcdn.com/image/fetch/w_474,c_limit,f_auto,q_auto:good,fl_progressive:steep/https%3A%2F%2Fbucketeer-e05bbc84-baa3-437e-9518-adb32be77984.s3.amazonaws.com%2Fpublic%2Fimages%2Febd33dec-edb4-49e1-8170-ff65df96fd39_3024x4032.jpeg)
![](https://substackcdn.com/image/fetch/w_474,c_limit,f_auto,q_auto:good,fl_progressive:steep/https%3A%2F%2Fbucketeer-e05bbc84-baa3-437e-9518-adb32be77984.s3.amazonaws.com%2Fpublic%2Fimages%2F34ba8871-cb35-4d61-b33c-fe99e82ac0fb_4032x3024.jpeg)
![](https://substackcdn.com/image/fetch/w_474,c_limit,f_auto,q_auto:good,fl_progressive:steep/https%3A%2F%2Fbucketeer-e05bbc84-baa3-437e-9518-adb32be77984.s3.amazonaws.com%2Fpublic%2Fimages%2F5057b371-2910-4c99-bdf1-65740ccd2209_4032x3024.jpeg)
Finally, I used the same fabric as the back fabric for the binding and attached it using a wiggling top stitch.
![](https://substackcdn.com/image/fetch/w_474,c_limit,f_auto,q_auto:good,fl_progressive:steep/https%3A%2F%2Fbucketeer-e05bbc84-baa3-437e-9518-adb32be77984.s3.amazonaws.com%2Fpublic%2Fimages%2F898e31c1-23ba-4fe7-85dc-2a2d7394d0fb_4032x3024.jpeg)
![](https://substackcdn.com/image/fetch/w_474,c_limit,f_auto,q_auto:good,fl_progressive:steep/https%3A%2F%2Fbucketeer-e05bbc84-baa3-437e-9518-adb32be77984.s3.amazonaws.com%2Fpublic%2Fimages%2Fb9cb881d-a181-456d-a218-6e405fb4525d_4032x3024.jpeg)
![](https://substackcdn.com/image/fetch/w_474,c_limit,f_auto,q_auto:good,fl_progressive:steep/https%3A%2F%2Fbucketeer-e05bbc84-baa3-437e-9518-adb32be77984.s3.amazonaws.com%2Fpublic%2Fimages%2F11d48f05-e367-4521-bfd3-ed279833d4d1_1440x1439.jpeg)
Because I had a fair amount of fabric remaining, I decided to whip of a couple of pillow cases to complement the quilt.
![](https://substackcdn.com/image/fetch/w_720,c_limit,f_auto,q_auto:good,fl_progressive:steep/https%3A%2F%2Fbucketeer-e05bbc84-baa3-437e-9518-adb32be77984.s3.amazonaws.com%2Fpublic%2Fimages%2F5dedbd72-2475-44d5-8020-ac58f4b313f3_4032x3024.jpeg)
![](https://substackcdn.com/image/fetch/w_720,c_limit,f_auto,q_auto:good,fl_progressive:steep/https%3A%2F%2Fbucketeer-e05bbc84-baa3-437e-9518-adb32be77984.s3.amazonaws.com%2Fpublic%2Fimages%2Fce28d589-c312-443b-b95d-f6a4e4b0c985_4032x3024.jpeg)
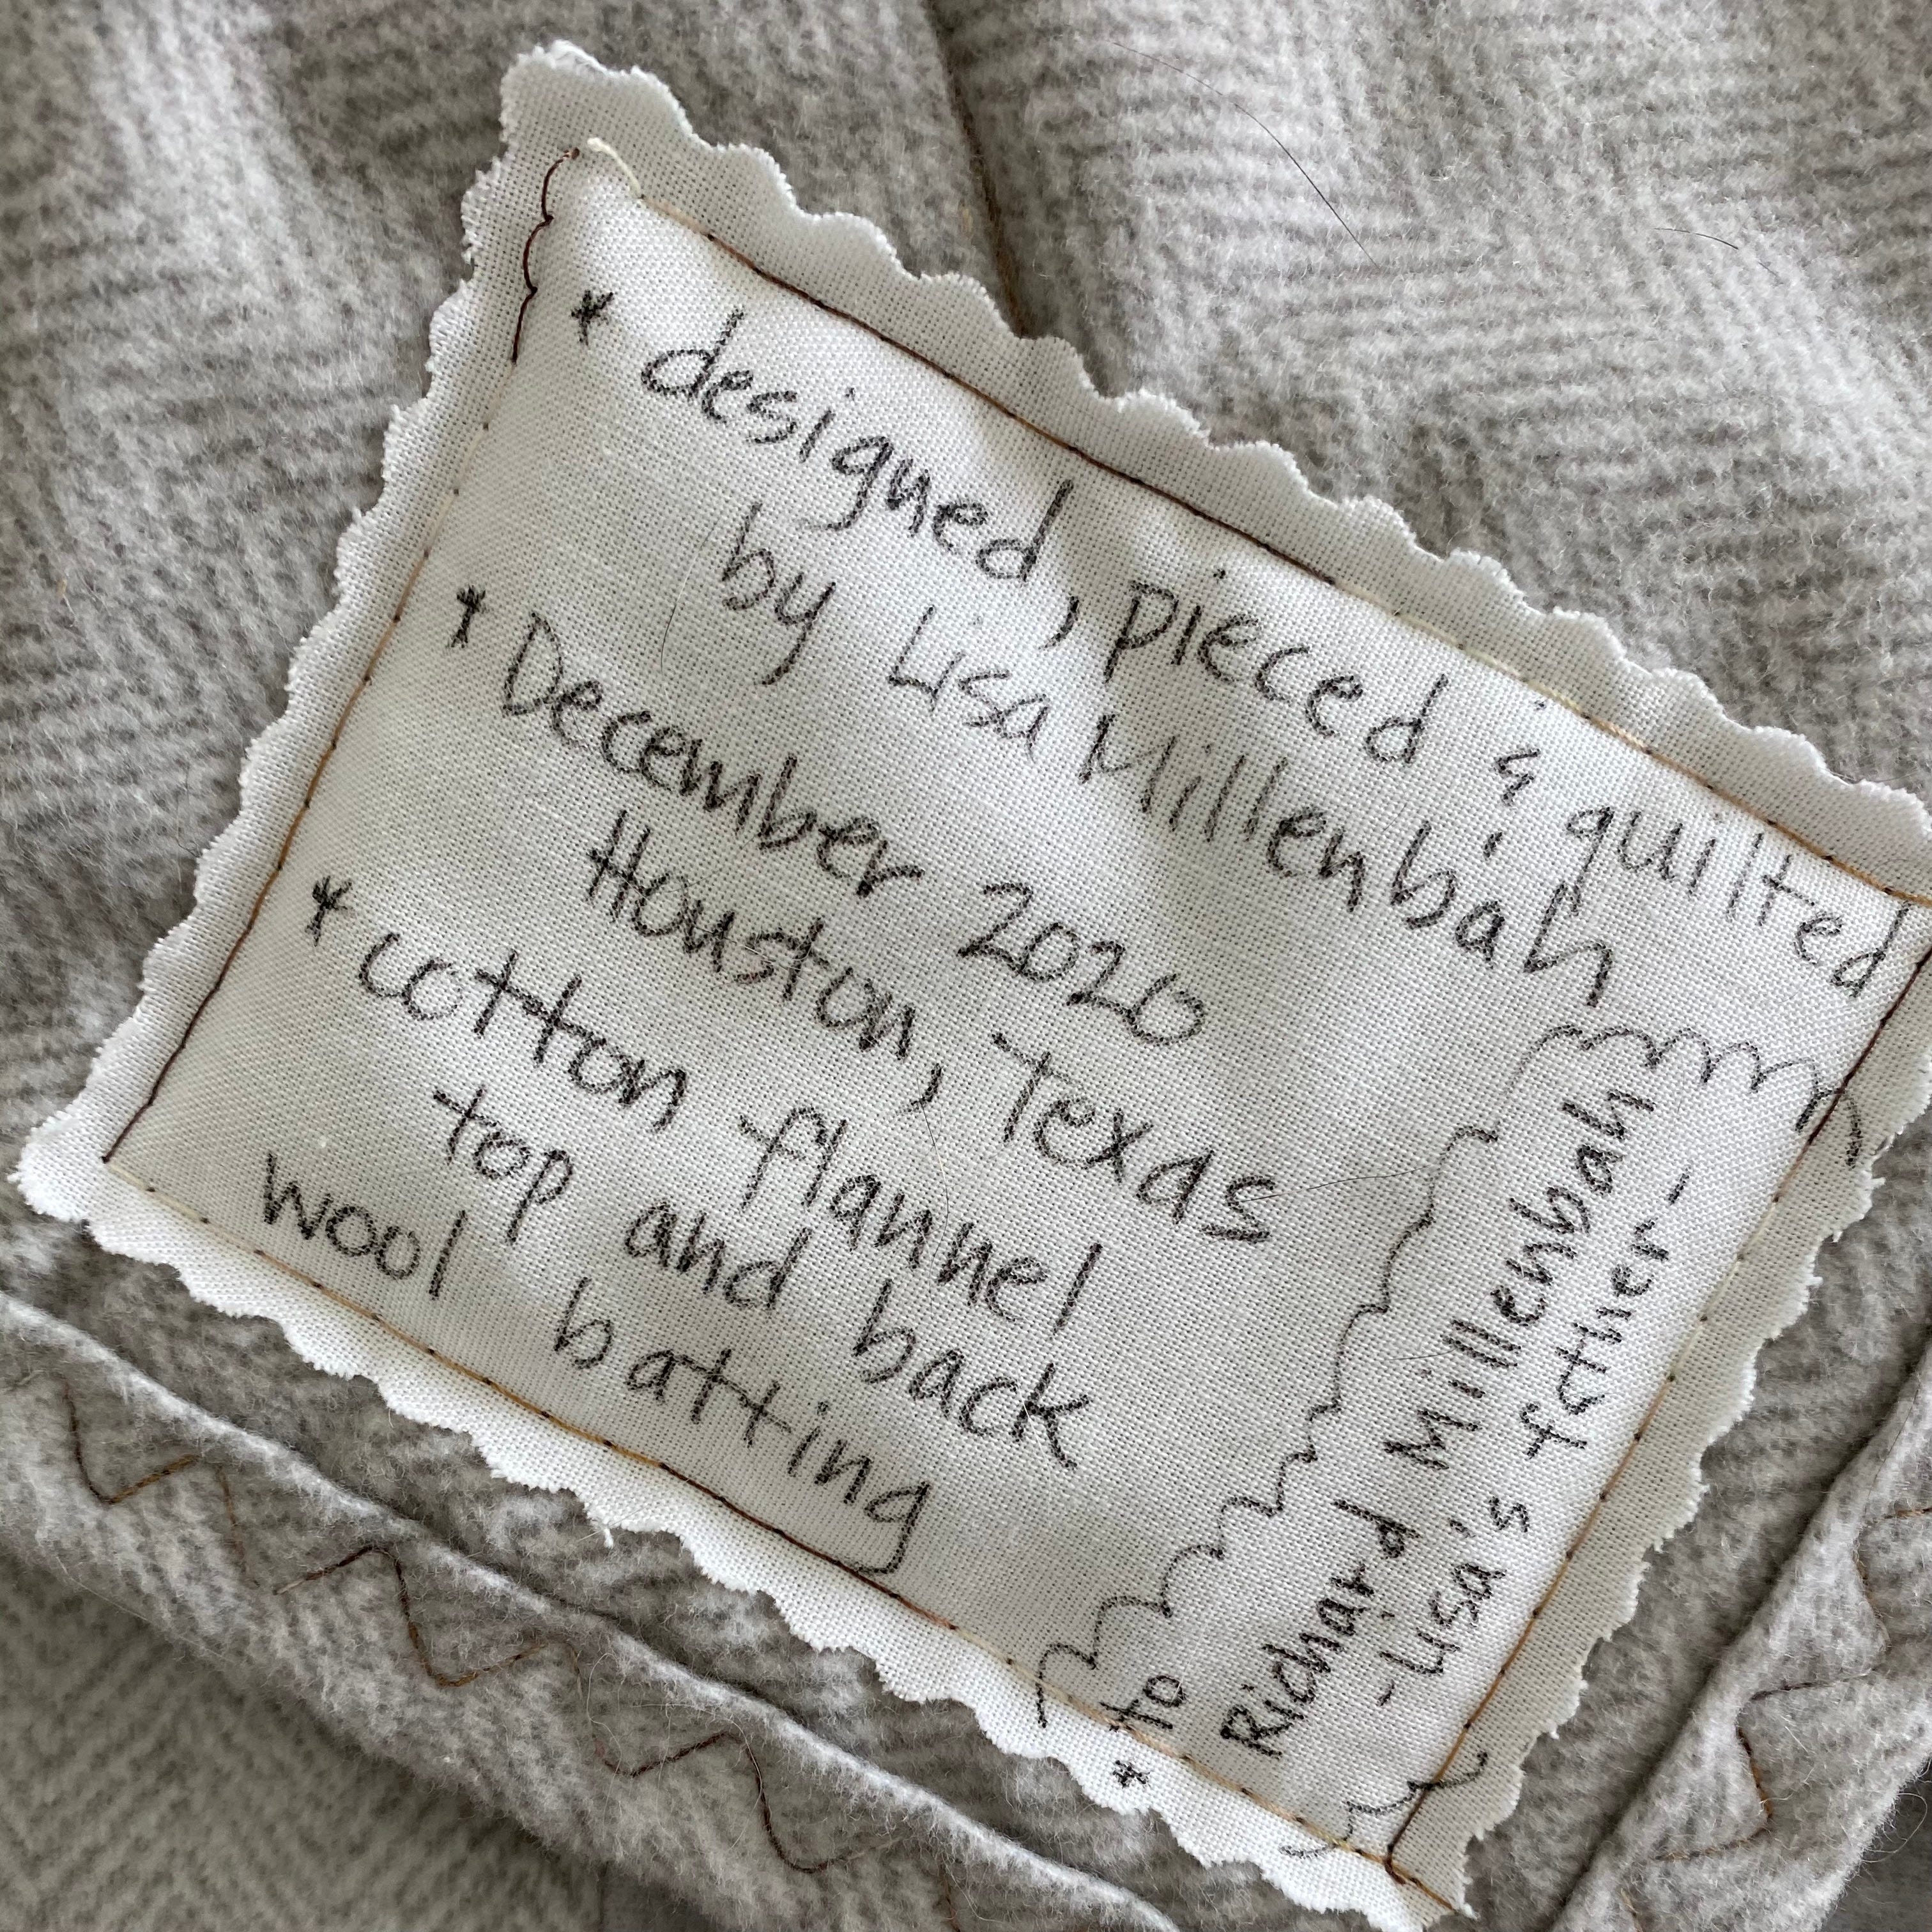
And last bit is a quilt label done by hand and stitched to back corner of the quilt.